Thursday 20 June 2013

Ceramic 3D printing tests 07 - some results

Well, it's my last day here at KHIO, for now. I will be returning in Novemeber to speak at the Norwegian Crafts Annual Meeting and hope to spend a few days here at KHIO to conduct some more tests. But by then I should have the ZCorp 406 running back in Manchester and have made some tests of my own.

I plan to continue the postings, and would appreciate any thoughts, reactions or assistance from like-minded explorers.


Results of the test bar firings: 


POWDER TYPE
RATIO *
LENGTH mm **
SHRINKAGE
950°C


Red Clay***
1:1:2
Turned to 'foam'

1:1:3
90
10%
1:1:4
91
9%
Potclays****
1:1:2
± 84
16%
1:1:3
86
14%
1:1:4
89
11%
1000°C
Red Clay
1:1:2
Turned to 'foam'

1:1:3
90
10%
1:1:4
91
9%
Potclays
1:1:2
± 84
16%
1:1:3
86
14%
1:1:4
88
12%
1050°C
Red Clay
1:1:2
Turned to 'foam'

1:1:3

These tests were dipped in vitreous slip, fired to 1000°C, then glazed and fired to 1085°C
1:1:4
Potclays
1:1:2
1:1:3
1:1:4
11000°C
Red Clay
1:1:2
Turned to 'foam'

1:1:3
88
12%
1:1:4
90
10%
Potclays
1:1:2
± 82
18%
1:1:3
83
17%
1:1:4
85
15%
1085°C GLAZE
Red Clay
1:1:2
N/A

1:1:3
89
11%
1:1:4
91
9%
Potclays
1:1:2
83
17%
1:1:3
85
15%
1:1:4
86
14%

* REFERS TO MIX OF SUGAR, MALTODEXTRIN AND CERAMIC POWDER, i.e 1:1:4 =1 part sugar, 1 part maltodextrin, 4 parts ceramic powder.

** Refers to the recessed 100mm line in the test bars measured after firing.

*** Pure red clay supplied by KHIO

**** Potclays ceramic powder mix, contains flux, supplied by Michael Eden (MIRIAD)


The Prtlnd Vase is still in the kiln, hopefully I will be able to unpack it before I leave here this evening... I'll let you know.
A second vase was printed yesterday and is still in the powder...

Wednesday 19 June 2013

Ceramic 3D printing tests 06 - and more...

19.06.13

My penultimate day here at KHIO in Oslo and a morning of ups and downs. I mentioned yesterday that we were asked to use a kiln with extraction that has the benefit of being able to control the cooling cycle.

As you can see, the new test cubes, with thicker walls, have suffered in the firing. one has broken in two, one has cracked and the third is OK.


The larger version of my architectural piece has also suffered. It has deformed due to the weight of the upper part and the shell has come away from the core. There are a number of possible causes:
  1. The speed of firing was too fast.
  2. The speed of cooling was too fast.
  3. The structure of the piece was not strong enough.
  4. The binder settings were wrong. 
  5. The ceramic powder formulation.
My feeling is that the cause was primarily either 1 or 2. Previous firings have been successful and the deformation of the pieces has happened in the printer, not in the kiln. 
The structure could be stronger to support the upper part.

We obviously need to conduct more tests, especially as the red earthenware seems to behave itself very well.

I have just found out that the Potclays powder will withstand 1300°C, so I plan to take some of the tests back to Manchester with me and try a selection of high temperature glazes.


So far today, the good news has been my Prtlnd Vase. It appears to have come through the printing unscathed, I'm very pleased with the detail of the surface decoration. There's litle loss of definition. The photograph shows the piece just after it was cleaned up in the depowdering unit, but it is still full of powder at this point. At this moment in time it is sat in a warm kiln, my next job, when I have finished writing this, is to remove the powder from the interior and put it back into the kiln on a warming cycle. And then programme the kiln to start firing at about 10pm this evening.
If it goes well, I will be able to take it home with me to decorate and glaze fire.


Here's what the Prtlnd Vase looked like on the Zprint software.

Before packing up for the day I glazed a selection of tests with the clear glaze and set them to fire overnight.

Tomorrow afternoon's kiln opening will be very interesting, hopefully there will be some posiitve results.

Tuesday 18 June 2013

Ceramic 3D printing tests 05 - Yet more...

18.06.13

Only 3 days left here in Oslo and suddenly I'm trying to work out how to fire more kilns than time allows! However, Knut who runs the ceramic workshop has asked me to use a larger kiln that has extraction. The sugars in the ceramic mix were filling the (huge) kiln room with caramelly smells (& smoke). The good thing about the larger kiln is that the cooling can be controlled and assisisted by fans, so I stand a chance to get the majority of the tests through.

Here's the results of the 1100°C firing. The only reason that the red clay bars are broken is that we (very non-scientifically) broke them to see how strong they are in the green, unfired state. The sugars actually make them fairly difficult to break, there was a certain amount of stretching, rather than a simple, clean snap. It gives you more confidence when removing pieces from the printer, though after 2 hours they are still flexible. We find that leaving them overnight is best.


Yesterday afternoon, Trine introduced me to some more tools in the modo software toolbox. I hoped to print a ceramic version of my Prtlnd Vase, an interpretation of the Portland Vase. I produced it in nylon by SLS and it was recently acquired through the Art Fund at Collect for the New Walk Gallery in Leicester.


The handles on the original CAD file are a little thin for ceramic printing and modo was a very useful for rebuilding them intuitively. The software also tidied up the mesh and considerably reduced the file size.
I was keen to build this as large as possible which meant converting all the Potclays powder to 1:1:4 which we think is the strongest of our trials. Trine had mixed some more yesterday, so that was sieved together with the rest and there was enough to completely fill the feed chamber. I had a conversation with Trond, who looks afetr the machines in D-Form. He suggested that the binder settings should be reduced as it could be the cause of the deformation in the build. He thinks they could simply be too wet. So I reduced the Shell to 85% and the Core to 70%. We will see if it has the desired effect.

After putting the build on, I mixed up a lovely lead-based clear earthenware glaze. The recipes that we have used for many years in the studio at home are Lead Sesquisilicate based, but they don't stock it at KHIO (who does?). The recipe I used is taken from 'The Potters Palette' by Christine Constant and Steve Ogden, an excellent source of some fabulous glaze recipes and shamefully out of print.

Lead Bisilicate 65
Whiting 10
Potash Felspar 15
China Clay 10

Fire to 1085°C with a 20 minute soak. A small amount of liquid calcium chloride added to the glaze prevents it from settling out and aids even glazing. But be cautious, if you add too much you can turn the glaze into the consistency of blancmange!


These pieces were popped into the kiln along with some vitreous slipped pieces. The plan for tomorrow is to slip and refire as much as possible and then glaze and fire them.

And then I'll hopefully have time to squeeze the Prtlnd Vase into a firing before my early morning flight back to the UK on Friday morning.

Monday 17 June 2013

Ceramic 3D printing tests 04 - More

16.06.13

Sunday morning is quiet in Oslo, mind you as a capital city it has a very relaxed, unhurried feel any day of the week. Someone will tell me that I happen to crossing pleasant, residential parts of town, but my impression is that people are friendly and are lucky to enjoy a safe and engaged lifestyle. One major downside though, is the expense. So I'm cooking up big pots of veggie bolognese sauce for pasta.


Anyhow, I arrived at KHIO before 9.00 and went straight down to the kiln room to see the results of the 1000°C firing. 
I have never seen such well equipped facilities as these. The kiln room alone is on an industrial scale, the students must either feel really excited on seeing them or completely daunted, particularly as some ceramics students have never touched clay before starting their degree!

The red clay 1:1:2 mix has decomposed more than at 950°C, but the other test bars look pretty similar. 
The shrinkage is approximately 14%, which I think is acceptable. When the tests are  finished I'll analyse them more carefully and publish the findings so that comparisons can be made easily.


I started another build with a new, larger version of my architectural piece and a test cube with thicker walls. This time I filleted the edge of the circular openings, as the first version has edges that are sharp and brittle.


And here are the 1050°C tests, the photograph taken just after the 'african vegetable' has been picked up! It came out of the kiln in one piece, quite an achievement considering the sections were very thin. I don't understand why the piece at the bottom right of the photograph broke in the firing. I don't think it was a stress fracture. The Potclays 1:1:3 and 1:1:4 are stronger than at the lower temperatures and are slightly stronger than the red earthenware versions.


The test cubes fired with very little extra distortion. They have now been dipped into the vitreous slip and await firing.


Saturday 15 June 2013

Ceramic 3D printing tests 03 - How?

15.06.13

Well, not exactly how, as I'm starting from the 'ground up' and there's a great deal to learn. 
But hopefully the collaboration between MIRIAD and KHIO will be the start of forming a larger community of 3D printing hackers and researchers willing to share experience and also to discuss the wider implications of 'digital making'.

The test bars fired to 950°C
KHIO is open at the weekends, so I was able to get in there first thing and unpack the first of our firings. As you can see, the results are 'interesting', the red clay 1:1:2 mixture has almost turned into a fired foam. There's obviously a lot of gas being given off, and not enough clay to bind the bar together. As there is flux (glaze material) in the Potclays powder, the 1:1:2 has held together much better. 
Both the 1:1:3 and 1:1:4 tests are similar, though I haven't tried to snap them yet. 
The next stage was to dip half of these tests in vitreous slip (recipe below) and fire them with the 1000°C test bars. I'll be able to unpack them tomorrow and see how they have fared.


Before leaving the Academy yesterday evening, we set up a new build with some more adventurous tests. And this is what they looked like this morning. Even though the pieces are completely supported by the excess material during the build, there is still a certain amount of distortion. They were printed in the Potclays 1:1:3 powder.


Trine's scan of an African vegetable looks excellent, but I didn't see the original, (or even view the stl file,) so I can't compare.


My cube tests are simply too thin, however I will fire them.


I must add that my architectural piece is designed to look warped! I have slightly re-designed this piece, altering the scale and wall thickness. I'm going to print them tomorrow and hope they are worthy of glazing.


Vitreous Slip Recipe:

These are UK ingredients, but I'm sure equivalents are obtainable in other parts of the world. I use it to make the 3D printed ceramic tests less porous and able to be glazed in the normal way. It is opaque and quite a bright white due to the high china clay content.

China Clay:  1kg
Ball Clay:     1kg
Potash Feldspar: 100gms
Zirconium Silicate (Disperzon): 100gms

It will fire to stoneware and possibly higher, though I personally haven't tried it at porcelain temperatures. It can be applied to plastic clay, though it's easier to apply to biscuit-fired ceramic. It can be stained with oxides and body stains.

Friday 14 June 2013

Ceramic 3D printing tests 02 - Why?

14.06.13

note the deformation.
The printing of the Potclays powder was a repeat of the red clay tests. 1:1:2, 1:1:3 and 1:1:4 mixtures were all successfully printed. 
It's important to leave the prints in the printer for 2 hours at the very least before removing them. Even after 2 hours some were a little soft and started to bend. Better to leave prints overnight, particularly if more complex parts are being printed.


All the test bars were left to dry on top of a warm kiln overnight and this morning the excess powder was removed in the depowdering unit and the 950°C firing started.
The kiln was still around 100°C from a previous firing, but I decided to take it up slowly - 7 hours to 600°C, then 2 hours to 950°C with a 30 minute soak.

Even though we are awaiting the results of the firings, it seems a good opportunity to print a more complex form. My instinct tells me that that the 1:1:2 mixture will shrink a great deal and probably be the weakest, so I'm inclined to try the 1:1:3 powder. We will see... 


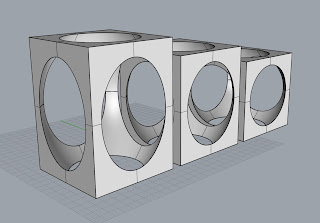
test cube
60mm test cube
First of all I quickly created a cube with a sphere removed from the interior. This gives us a simple shape, probably impossible to slipcast that has a surface that just about covers every angle. So it makes a good glaze test, as well as testing the rigidity of the ceramic powder.

I actually set 3 versions printing, one as designed, the other two scaled one dimensionally to allow for possible deformation in the drying and firing.


test cubes
80, 70, 60 mm test cubes
It's important to remember that this is not simply a technical exercise. If successful, there may be all sorts of potential uses for ceramic 3D printing, certainly medical being one of them. But that is not my prime motivation. Rather selfishly I suppose, I hope to be able to print my artworks in ceramics thereby combining my previous experience as a maker of slip-decorated earthenware, my understanding of the 3-dimensional form and my interest in the act of making with this new, so-called post-industrial technology. So it's all about research, not technical research, though that can't be avoided, but research that engages with our fundamental relationship with objects and the making of them.
I feel it is timely to look at this area, not just because we have new tools, but because our increasing reliance on 2-dimensional screens to engage with the physical world has the potential to detach us from the sensory experience and feedback we receive when we take the trouble to venture outdoors, smell those flowers in the garden, pick up that smooth stone or spot the woodpecker calling from a tree. You probably think I'm just being romantic, after all I'm one of the generation that bridges the digital divide, but when I hear about the exciting advances in augmented reality, where it will be possible to surround ourselves with virtual objects, rather than actual, physical stuff then surely it's time to question the very nature of our relationship with objects.
WIll we need to buy another pot or painting to decorate our homes when we will be able to simply download a holographic Ming vase?

Anyhow, I'll just leave that hanging in the air...


Wednesday 12 June 2013

Ceramic 3D printing tests - What?

10.06.13 – 20.06.13

Oslo National Academy of the Arts (KHIO)


In April, I was invited over to KHIO to give a lecture about my work and to meet the staff in both the ceramics and D-Form departments. Paul Scott, one of my colleagues in MIRIAD is a Professor 2 at KHIO and had the idea to arrange a collaborative venture around the theme of ceramics and print, something that has been a specialism of his for a number of years. However, the planned event is to focus on the 3D printing of ceramics, something that Trine Wester who runs the D-Form 3D printing facility has started to explore.

Back in Manchester, we have acquired 2 ZCorp 406 3D printers, both in need of restoration. The plan is to restore one of them and use it to continue the ceramic printing experiments. Whilst I am waiting for the printer to be housed in a suitable room, I thought a very good use of my time was to head back to Oslo to learn about using ZCorp printers by working with the D-Form team. This time I was keen to explore the ceramic powder that Potclays had developed for 3D printing. I purchased 15 kgs, which just fitted into a small suitcase and passed through airport security without any questions!

On the Monday morning we made a good start by moving the printer, de-powdering unit and computer down into the ceramics department.

The plan was to test and compare red earthenware with the Potclays powder. The recipes are as follows:

RED CLAY
POTCLAYS
ICING SUGAR
MALTODEXTRIN
2

1
1
3

1
1
4

1
1

2
1
1

3
1
1

4
1
1

Each batch was prepared in 3kg batches. Once printed the tests would be fired in batches to 950°, 1000°, 1050° and 1100°C.


I designed a small test bar with a precise 100mm slot in the top to be used to accurately measure shrinkage.

On Tuesday morning the first tests were printed.

There follows a description of how the printer was prepared:


1. Compacting the powder.


2. Levelling the powder


3. Filling the binder tank with zp61 binder fluid


4. Cleaning the print head parking dock with distilled water.

 5. Purging the HP10 print head of ink and 
 bleeding the binder tube for air bubbles.


6. Cleaning the print head 'pogos' with an alcohol swab.
(Squeeze the tube to release the alcohol)


7. Print settings, 
(note the Bleed Compensation is checked).

8. Powder settings, note that in all other 
tests the Shell was 90% and the Core was 85%

9. Printing the binder, (note some ink still visible).
10. Potclays 1:1:4 powder, smoother
 and finer than the red earthenware.


Tomorrow we print more Potclays powder variations, so that the firings can commence on Friday.

More to follow...